

What is Cricut Design Space and How does it work? I’m giving you all the details you need to know about Cricut’s design platform!

If you are brand new to Cricut, haven’t ordered your Cricut, or are considering making the switch to the Cricut machine, this post is a MUST READ. Plus, if you scroll down to the bottom of this post, you’ll get a FREE Cricut Design Space Tool Guide!
What is Cricut Design Space?
In order to use the Cricut, you have to have Cricut Design Space installed on your computer or iPad. Make sure you click on that link to take you to the download page, then follow the instructions there.
After that, you’ll be asked to connect your machine, so make sure you have your Cricut machine turned on. This step only takes a couple of seconds, then you’re ready to go!

How does Cricut Design Space Work?
After you have it installed, you’ll use Cricut design space to create Cricut projects. You’ll be able to create your own designs, upload purchased files, and use Ready to Make Cricut Projects.
The following tutorials are also very helpful for getting started with Cricut Design Space.
- Get Started in the New Cricut Design Space
- My Favorite Cricut Design Space Updates
- How to Edit Text in Cricut Design Space
- How to Create Custom Designs in Cricut Design Space
- 11 Reasons You Need a Cricut Access Subscription
- How to Customize a Cricut Access Project
- How to Upload Patterns to Cricut Design Space
- How to Upload Print and Cut Files to Cricut Design Space
- How to Upload SVG Files to Cricut Design Space
- How to Create a Cricut Print and Cut Project from SVG Files
- How to Use the Slice Tool to Make Large Vinyl Decals
- How to Use the Weld Tool in Cricut Design Space
- How to Use the Cricut Contour Tool with SVG Files
- How to Design Custom Invitations in Cricut Design Space
- Make Your Own Invitations from SVG Files in Cricut Design Space
It may seem overwhelming at first, but I’m going to break down the basics for you!

Home Page
After you have it installed, you’ll be able to create new projects, pick from a variety of ready to make projects, and you can also click links to view Cricut Tutorials.
Click here to see my Ready to Make Projects
Another fun thing about the home page is you’ll be able to see work created by the Cricut Community.
Another thing I want to point out – those three lines by the word HOME in the top left corner is where you’ll be able to:
- Edit your profile and account info
- Check for machine updates
- Calibrate your machine
- Purchase Cricut Access (read why you may want Cricut Access HERE)
- Get Help if you have questions about your machine
- Manage Custom Materials

Templates
Templates are images that help you figure out the size of your design. Templates will not cut when you send your project to your machine, they are simply guidelines.
You can search through the templates to find what works for you, but you’ll find templates for:
- Clothing like t-shirts, hoodies, flip flops etc.
- Mugs
- Kitchen aid mixers
- Electronic Devises
- Mugs, wine glasses, and other home decor items
- And much much much much more…seriously, there’s so many templates!

Projects
Projects are great for beginners! These are all ready to go, or your can choose to customize them. You’ll find projects for just about every occasion, but here’s a few examples:
- Cards
- Accessories like earrings, makeup bags, headbands, etc.
- Sewing Projects
- Infusible Ink Projects
- Mugs for the MugPress
- Iron-on
- Kid Activities
- Parties and Events
- Planners
- Wreaths
- Vinyl Projects
- Etc., etc.
The thing I love about projects is they’re so easy to make, plus the materials and instructions are already listed for you.

Images
Cricut has a variety of FREE images available in Cricut Design Space, or you can sign up for Cricut Access to get instant access to tens of thousands of images and fonts. Plus, there are other amazing benefits to Cricut Access. You can tell what images are included by the green flag with an A in the corner.
Again, there are images for every occasion, but I also wanted to tell you what types of images you can find in Cricut Design Space.
- Cut Images
- Draw Images
- Cut and Draw Images
- 3D images
- Phrases (you can also search for specific languages)
- Cards
- Sign Layer Images
- Multi-layer Images
- Search by brand (like Disney, Anna Griffin, Marvel, etc) – please note some licensed designs may not be included in Cricut Access
- Images for specific materials
You can also easily search images in the search bar.

Text
The Text tool allows you to insert custom text onto your project. You can use fonts that are on your computer, or use free Cricut fonts, or fonts available with a Cricut Access subscription.
When you click on the Text Tool, the toolbar will pop up where you’ll be able to:
- Select a font
- Select a style (bold, italic, etc.) Please note that this option is not available on every font family.
- Select the font size
- Adjust the space between letters
- Adjust the space between lines
- Align text left, right, or center
- Curve your text
- Ungroup the letters or lines of your text. Once you do this, you won’t be able to edit what your text says.

Shapes
Shapes is the best way to create your own images in Cricut Design Space. You can add your basic shapes like squares, circles, triangles, etc., and you can also add a line that would be used for scoring images.
You can combine shapes with other shapes using the weld and slice tool, which I’ll explain in more detail in the tools section.
I created my Monster Photo props almost entirely using shapes, so that will give you a good idea of what you can create with Cricut shapes!

Upload
You can also upload your own files to Cricut Design Space using the Upload Tool. You’ll be able to upload:
- SVG files (vector image)
- PNG files (flat image with a transparent background – great for Print and Cut projects)
- GIF files
- BMP files
- DXF files (also vector, but only supported on desktop version)
- Pattern fill files (a flat image that has a pattern on it)
Make sure you check out some of my FREE SVG and PNG Files to try this out for yourself:
- Create Hand Lettered Cricut Cut Files in Adobe Illustrator
- Create Hand Lettered SVG Files with the Cricut Bright Pad
- How to Upload SVG Files to Cricut Design Space
- FREE Hand Lettered “You’re A Gem” SVG File
- Free Haunted Mansion SVG Files
- Cornhole Bags Tutorials with Free Corn SVG File
- FREE You Shuck at Cornhole SVG File
- Pin the Horn on the Unicorn Party Game
- FREE Unicorn Party Printables and Cut Files
- Make Your Own Unicorn Printable Activity
- How to Turn Kid Art into SVG Files
- Hello Fall SVG Files
- Hand Lettered Wood Sign SVG Files
- Home for Christmas SVG File
- Thankful SVG File
- Good Cheer SVG File
- FREE Spend My Life Laughing SVG File
- Free Snow Cool SVG File
- Free You Stole My Heart SVG File
- Zombie Ate My Heart SVG File
- On Today’s Menu SVG File
- Adulting Bad, Coffee Good SVG File
- Oh Baby SVG File

Cricut Design Space Tool Guide
You’ve probably noticed a lot of other tools in Cricut Design Space. You can reference the image above or download the Free Tool Guide at the bottom of this post for a reminder, but here’s a quick overview of the Cricut tools you see on your Canvas.
Top Toolbar
- Undo/Redo – undoes or redoes an action
- Operation – where you select to cut, draw, or score an image in your project
- Select – click this to select or unselect an image
- Edit – cut, copy, or past an image
- Offset – creates a larger or smaller outline of your image
- Image Tools – use these to align images, arrange them from front to back, or flip images
- Sizing, Rotation, Location – use these to type in a precise size, rotation, or location of an image on your canvas
Top Right Tools
- Group – group images to make layers easier to work with. The images will cut separately.
- Ungroup – ungroups images
- Duplicate – creates a copy of an image
- Delete – deletes and image
- Color Sync – click on this to make sure all your images are cutting on the right material using color as your guide
Bottom Right Tools
- Slice – cuts one image out of another image. Check out this tutorial to see how to use this tool.
- Weld – combines two images together to make one image. Check out this tutorial to see how to use the weld tool.
- Attach – use this to select images that you want to cut together on one material.
- Detach – if your images are attached, the attach tool will turn into the detach tool, and you’ll use this to undo the attach function.
- Flatten – Similar to attach, but it will flatten an image so you can print and cut that image. It will only cut around the outermost image. You can see how to use this tool here.
- Contour – there may be certain pieces of a design you don’t want to cut, so you would use the contour tool to specify which pieces to cut. Check out this tutorial to see how to use the contour tool.
Also, in the bottom left corner, you’ll be able to zoom in and out of your canvas.

Prepare
After you click the MAKE IT button on your home screen, it will take you to the PREPARE page. This is where you’ll:
- Select your Mat size (or if you have a Cricut Joy, you’ll select if you want to cut without a mat)
- Mirror your image for iron on or infusible ink projects.
- Arrange where your images will cut on the mat.
When you’re ready, click continue!
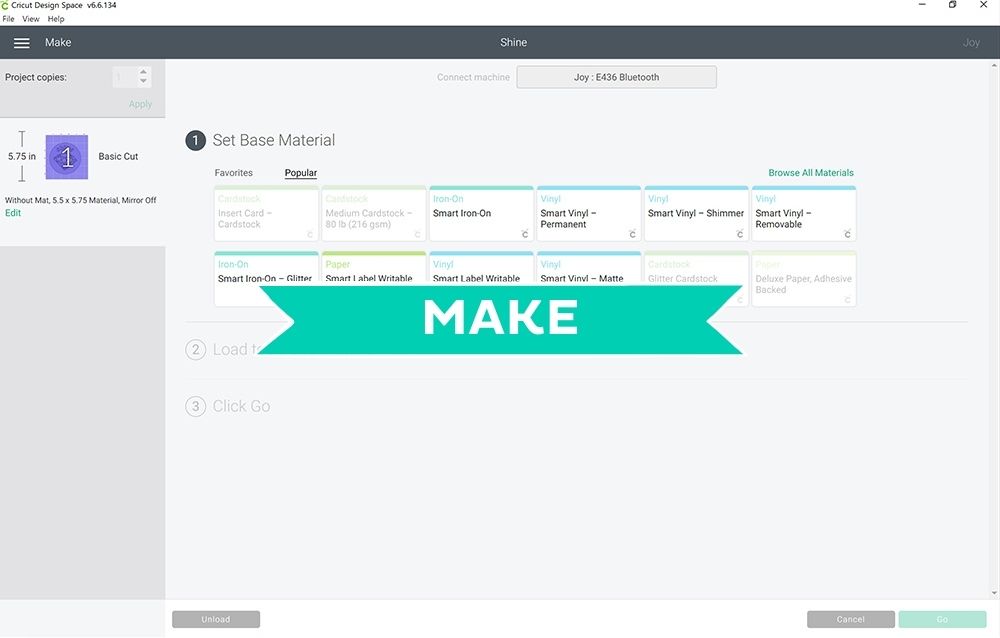
MAKE
This is where it all comes together!! On this screen in Cricut Design Space, you’ll:
- Click EDIT to make sure you mirrored your image.
- Select your material
- Click unload if you placed the wrong material on the mat.
- Click Cancel if you need to fix something before you cut.
- Your machine will automatically tell you to change your tools (say you’re using the scoring wheel and/or Cricut pens on the same project).
When you’re ready, click GO!

I hope this helps answer your Cricut Design Space questions! The more comfortable you are with it, the more you can create with your Cricut Machine!
Download the FREE Cricut Design Space Tool Guide PDF
Want a quick guide to answer What is Cricut Design Space and How Does it Work? Download the PDF below!


Leave a Reply