
You can easily make Glitter HTV Shirts with your Cricut using this tutorial! This will show you step by step instructions to make the perfect sparkly custom t-shirt!

Two posts in one day??? Must be the apocalypse. Anywho, I created this t-shirt for my daughter while showing you how to Create Custom Designs in Cricut Design Space…and I thought this tutorial for Glitter HTV Shirts was too good to make you wait for it. So before you start this, check out that post so you can see exactly how to make this Hexagon Love Design.

What you’ll need to Make Glitter HTV Shirts:
- Tutorial for creating your own design HERE.
- Cricut Explore Air 2
- Cricut Mat
- Glitter Iron-on
- XL Scraper (optional, but it’s handy!)
- White T-Shirt
(wash and iron the shirt before starting)
- Iron and Padded Ironing Board
- Weeder Tool
[amazon_link asins=’B00TTESL18,B00BSK750Y,B00BV4IQ64,B00EZUCUUE,B01ETUX9U4′ template=’ProductCarousel’ store=’strawbemomm03-20′ marketplace=’US’ link_id=’908c6be3-f463-11e6-a52a-9302c02474cf’]

- After you get your custom graphic created, you’ll send it to the Cricut. Make sure you have the design flipped when you send it to the Cricut, otherwise it will appear backwards on your shirt.
- Place the HTV (iron-on) material FACE DOWN on the Cricut Mat. Use the XL Scraper to even it over the mat and make sure it sticks evenly.
- Adjust the setting to Iron-on (I used the middle setting for the Glitter Iron-on from Cricut)
- Cut it out with the Cricut, then use the Weeder to take away the parts of iron-on you will not place on the shirt. Tip: Cut around the image after you cut it out, so you don’t have to waste all that material!
- Turn your iron to the Cotton/Linen (usually the highest setting), but make sure the STEAM setting is OFF.
- When the iron is heated, iron the part of the shirt the transfer material will be on.
- Place the weeded image on the shirt, with the liner side up. Iron it with medium pressure for about 25 to 30 seconds. Flip the shirt over, then iron the back for 25-30 seconds. Tip: Cover the image with a light fabric when you iron it. That will protect your shirt from getting burned by the iron and keep the iron from sticking to the liner.
- Let it cool for a couple minutes, then remove the lining.

My daughter could not wait to wear this shirt and now I’m jealous that she has one and I don’t. Seriously…I’m buying a white shirt so I can make one for myself. To make sure the image lasts, wash and dry the shirt inside out. You can learn more and get more tips for iron on transfers HERE.

Seriously…look at that pose! She was one happy girl!
If you liked this, check out these other Cricut tutorials:
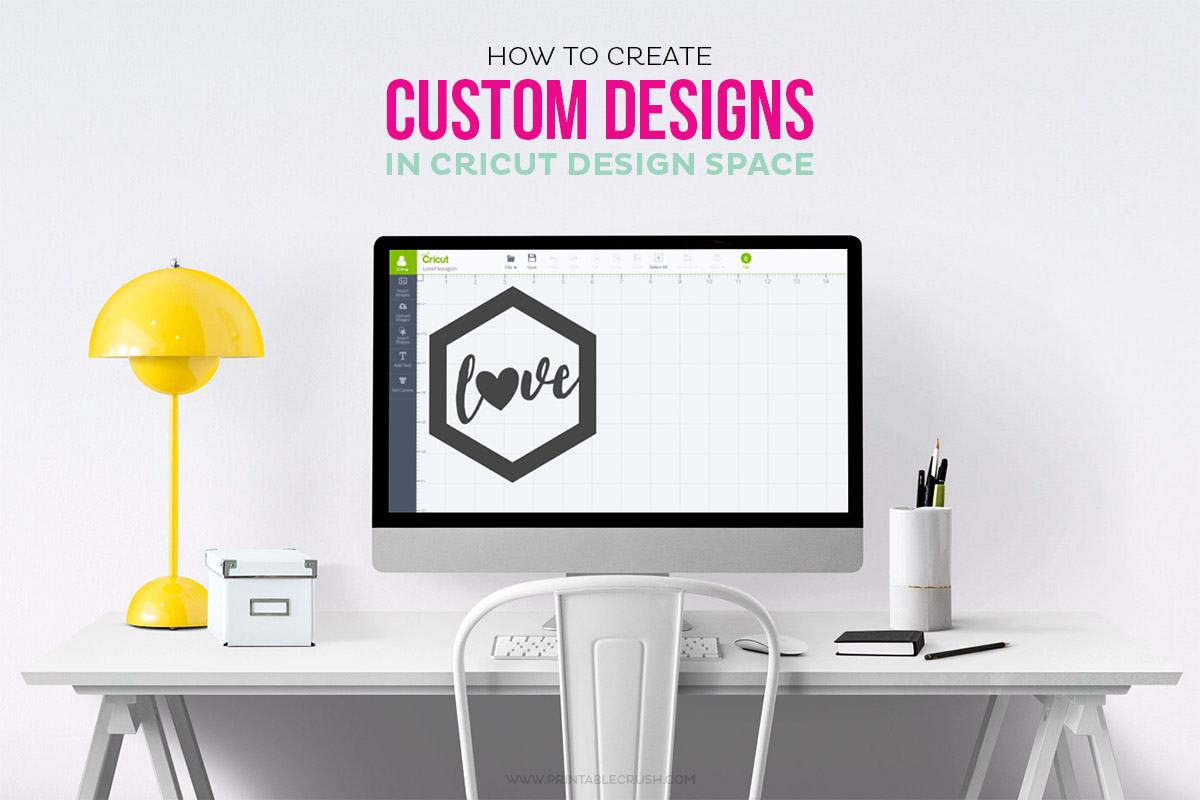
How to Create Custom Designs in Cricut Design Space

Hand Lettered Wood Sign Tutorials


Leave a Reply